
How to Install a Vanity Light Wall Mounting Plate (2026)
TLDR
A vanity light wall mounting plate is the hidden metal bracket that connects a bathroom vanity light to the wall electrical box. It provides screw points, helps level and center the fixture, and lets wires pass through safely. If this plate is missing, mismatched, or confused with the decorative backplate or junction box, installation problems follow. This guide explains what the plate is, the different types, and what to verify before buying or mounting a vanity light.
Planning a vanity wall light for an Indian bathroom? Check the Caral wall light for a sense of how backplate size, finish, and mounting hardware work together in a real product.
What Is a Vanity Light Wall Mounting Plate?
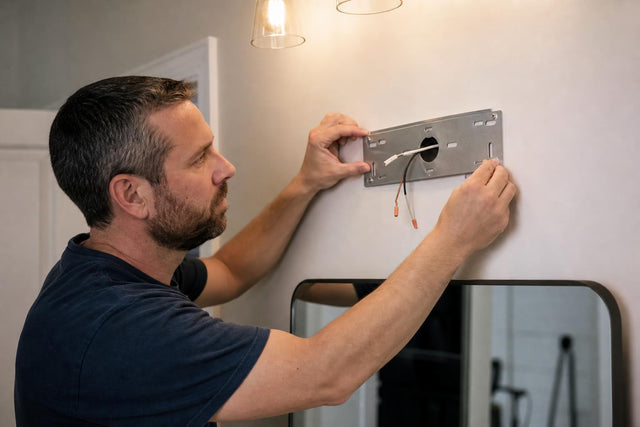
A vanity light wall mounting plate is the metal plate, bar, strap, or bracket that fastens a wall-mounted vanity light to the electrical box (or directly to the wall, when the fixture manual allows it). It sits behind the fixture, hidden from view once installation is complete.
New vanity lights typically ship with this plate included. According to Home Depot’s installation guide, the mounting plate secures to the junction box and is commonly shaped like a disk or a bar. HomeServe’s guide confirms that vanity light mounting plates may be round or rectangular and are used to attach the fixture to the wall electrical junction box.
The plate does several things at once:
- Gives the fixture its screw points so it stays firmly on the wall.
- Helps align and level the light over the mirror or basin.
- Has a center opening so supply wires can pass through.
- May include a green grounding screw.
- Lets the decorative backplate sit flush against the wall surface.
Despite being small and hidden, this is the part that determines whether a vanity light hangs straight, sits tight against tile or paint, and stays safely attached for years.
Also Called
People use different names for this part, which causes endless confusion during installation. You might see it called a mounting bracket, fixture bar, crossbar, mounting strap, or simply “the bracket.” On the DoItYourself forum, users and moderators refer to missing vanity light plates as flat discs, flat straps, or fixture bars, noting that hardware stores usually carry generic versions.
The word “backplate” causes the most trouble. Sometimes it means the hidden mounting plate. Other times it means the visible decorative cover on the back of the fixture. These are often two separate pieces with two separate jobs.
Why the Mounting Plate Matters
It is tempting to treat the mounting plate as an afterthought, just a small metal accessory in the hardware bag. That is a mistake. Here is what it actually does in the fixture system.
Supports the Fixture
The plate fastens to the electrical box, the wall, or both, depending on the manufacturer’s instructions. The fixture body then attaches to the plate with screws, studs, or cap nuts. A Lowe’s vanity light manual shows the mounting plate being attached to the outlet box, then adjusted and leveled before the vanity bar is secured. That same manual warns that wire connectors will not support the weight of a fixture. The wires are for electrical connection, not mechanical support.
Aligns the Light
A vanity light that is 15 mm off-center looks wrong, especially above a carefully placed mirror. The mounting plate often has slotted holes or multiple threaded holes so the installer can rotate, adjust, or nudge the fixture into perfect alignment. Hunter’s installation guide instructs installers to match the threaded holes on the mounting plate to the fixture backplate holes before tightening screws.
Lets Wires Pass Through
Most vanity light wall mounting plates have a center hole. The supply wires from the wall box pass through this opening before the plate is screwed down. This keeps the wiring organized and accessible for connections without pinching or crimping.
Provides a Grounding Point
Some metal mounting plates include a dedicated green ground screw. One bath vanity light manual labels the mounting plate diagram with electrical box screw holes, wall mounting screw holes, and a green ground screw as part of the standard hardware layout.
Helps the Fixture Sit Flush
The relationship between the plate and the decorative backplate determines whether the light sits neatly against tile, painted drywall, stone, or mirror glass. If the electrical box is recessed too deep, protrudes outward, or is the wrong type, the fixture may wobble, gap, or tilt. Practitioners on Reddit report that misaligned holes and non-flush boxes are among the most common real-world problems during vanity light replacement.
Mounting Plate vs. Backplate vs. Junction Box
This is the single biggest source of confusion in forums. Searchers often call all three parts “the plate.” They are not the same.
Think of the assembly as three layers stacked outward from the wall:
Layer 1: The Box. This is the electrical enclosure, sometimes called a junction box or outlet box. It sits in (or on) the wall, contains the wiring connections, and often provides threaded screw points. It is not part of the fixture.
Layer 2: The Plate. This is the vanity light wall mounting plate. It attaches to the box (or wall) using screws through its slots. The fixture then attaches to it.
Layer 3: The Backplate. This is the visible, decorative rear face of the fixture. It covers the plate, screw heads, wall opening, and wiring area. It is the part you see after installation.
Most vanity light problems happen because one of these three layers is missing, misaligned, or confused with another:
- Missing box means unsafe or non-compliant wiring.
- Missing plate means no proper support or alignment for the fixture.
- Too-small backplate means old holes, tile cuts, or paint marks remain visible.
- Off-center box means the light may not center over the mirror.
- Wrong plate means fixture studs or cap nuts do not align.
On Stack Exchange, a well-regarded answer summarizes the practical rule: a junction box is generally required, with some exceptions for bathroom vanity bar fixtures that have an integral and complete backplate designed to serve that function. Those exceptions are fixture-specific, not a general license to skip the box.
When comparing wall-mounted fixtures, check how these three layers work together. Products like the Ledios and Palma show how backplate dimensions and mounting hardware vary across designs.
Common Types of Vanity Light Mounting Plates
Not all plates look the same. The type you need depends on the fixture design, the wall box, and the weight of the light.
Crossbar or Mounting Strap
A narrow metal bar with slotted holes. This is the most common type for sconces and smaller wall lights. It screws into the box, and the fixture screws into the bar.
Best for small or medium vanity sconces and straightforward replacement installs. It may not work for a long vanity bar that needs widely spaced studs.
Round Universal Plate
A circular or disk-shaped plate with multiple slots and holes, allowing the fixture to be rotated and adjusted. Home Depot notes that mounting plates are commonly disk- or bar-shaped.
Best for compact vanity lights and fixtures where orientation flexibility matters. The word “universal” is misleading, though. It does not mean every fixture or decorative backplate will fit.
Rectangular or Full-Width Tray
A longer plate or tray that spans the width of a multi-light vanity bar. This type provides wider support and may help cover the wall opening.
Best for multi-bulb vanity bars and long LED vanity lights. It may rely on both the electrical box and wall anchors, depending on the manufacturer’s listing.
Fixture-Specific Plate with Integral Studs
Some fixtures ship with a special plate that has studs permanently fixed at the correct spacing. In a Reddit thread about installing a vanity light without the bracket, commenters pointed out that a generic crossbar won’t work when the fixture needs a backplate with integral studs matched to its own holes.
Best for designer lights, imported fixtures, and decorative vanity lights with non-standard hole spacing. If this plate is lost, a generic bracket probably will not substitute safely or neatly.
Wall-Anchor-Assisted Plate
Some wider or heavier LED vanity fixtures use both an electrical box connection and wall anchors for anti-rotation support. One bath vanity light manual offers two options (anchoring to the box or to the wall) but both options still require power from a standard recessed electrical box. Wall anchors help stabilize the fixture body, but they do not replace the electrical box, the wiring enclosure, or the grounding path.
What to Check Before Buying a Vanity Light
This checklist is missing from most installation guides online, and it is arguably more important than the installation steps themselves. Getting these right before purchase prevents the most common mounting plate headaches.
1. Backplate size. Will the visible backplate cover the old wall hole, paint shadow, tile cut, or mirror cutout left by the previous fixture? If the new fixture has a smaller backplate, you may need wall repair before installation.
2. Mounting hardware included. Confirm that the plate, screws, cap nuts, anchors, wire connectors, and instructions are all in the box before scheduling your electrician.
3. Plate type. Is it a crossbar, round plate, rectangular tray, or fixture-specific bracket? This determines compatibility with your wall box.
4. Junction box position. Is the wall point centered over the mirror or basin? If not, you either need a fixture with a wide backplate, a box relocation before wall finishing, or an approved offset solution.
5. Wall material. Drywall, tile, mirror glass, marble, stone, wood paneling, and concrete each affect drilling, anchors, box extensions, and final appearance.
6. Fixture weight. Long metal vanity bars, glass shades, and heavy decorative sconces need support that matches the fixture weight. The wall box and mounting plate must handle the load.
7. Moisture suitability. UL’s luminaire marking guide defines damp locations as areas subject to condensation and wet locations as areas where water may drip, splash, or flow on electrical equipment. Only fixtures marked suitable for damp or wet locations should be used in those areas. For bathroom vanity spots near showers or in poorly ventilated rooms, this matters.
8. Voltage and driver compatibility. For Indian homes, verify that the fixture or its LED driver works with the local 230 V, 50 Hz supply.
9. Mirror and cabinet clearance. Check whether the fixture body, shades, screws, or side caps will clash with mirror frames, medicine cabinets, or wall cabinets.
10. Color temperature and CRI. While you are checking mounting hardware, also check the light quality. Practitioners on Reddit consistently recommend CRI 90 or above and warm-to-neutral color temperatures (2700K to 3500K) for bathroom vanity lighting, particularly for grooming and makeup accuracy.
If you are comparing wall light options with clear specs on size, finish, and materials, the Texas wall light and Troy wall light are worth examining for how product pages present the details that matter for installation planning.
Common Problems and What They Usually Mean
These are the issues that drive most of the online searches around vanity light mounting plates. Each one has a safer next step.
Missing Mounting Plate
The plate was lost, thrown away, or never included. Do not assume drywall screws into the wall are good enough. First identify whether the missing part is a generic fixture bar or a fixture-specific plate. On the DoItYourself forum, moderators note that hardware stores carry generic fixture bars. But on Reddit, commenters warn that some fixtures need a manufacturer-specific backplate with integral studs. If you cannot identify the right replacement, contact the fixture seller or manufacturer.
Plate Holes Do Not Line Up with the Box
This is extremely common and usually has a straightforward explanation. Practitioners on Reddit report that many users confuse the screws that attach the plate to the box with the screws or studs that attach the fixture to the plate. One DIY thread clarifies that the slots in the plate are for the junction box and the screws on the plate attach to the fixture. Try rotating the plate, using the slotted holes, and double-checking the fixture manual before assuming incompatibility.
No Junction Box Visible
Old vanity lights were sometimes mounted to a wall plate or directly to the wall without a proper box. This is a red flag for a new installation. Some older vanity bars may have had an integral wiring compartment, but a bare wire coming through drywall should not be treated as acceptable. Have an electrician install an appropriate box or verify that the selected fixture is designed for that installation method.
Electrical Box Is Off-Center
Plumbing pipes, wall studs, or the previous layout may place the box somewhere that does not align with the mirror centerline. One Reddit renovation thread notes that plumbers often run pipes exactly where the vanity light box would ideally go. Options include choosing a fixture with a wide backplate that allows visual centering, moving the box before wall finishing is done, or selecting a fixture that permits offset mounting.
Fixture Does Not Sit Flush
This usually comes down to box depth (too recessed or protruding), incorrect plate orientation, crowded wires pushing the plate outward, or the wrong plate entirely. Check the fixture manual and the box depth against the plate’s design before forcing anything.
Old Wall Damage Shows Around the New Light
The new fixture has a smaller backplate than the old one. Old screw holes, paint shadows, tile cuts, or mirror openings are visible. The fix is either to choose a fixture with a larger backplate or to repair the wall finish before installing.
Tiled-Over or Buried Junction Box
A Reddit renovation thread describes a situation where tile was installed over the vanity light junction box, making it impossible to mount the light to the box afterward. This is a strong cautionary example. In Indian bathrooms especially, where tile, marble, or mirror panels are often finished before fixture installation, burying the box behind a finished surface creates an expensive problem.
Safety Notes for Bathroom Vanity Lights
This section is not a substitute for a qualified electrician’s assessment. These are the principles that matter most.
Turn off power at the breaker or main switch before any electrical work. Verify with a voltage tester, not just the light switch.
Do not let wires carry fixture weight. The wires are for electrical connection. The fixture must be supported by the approved mounting hardware and box structure described in its manual.
Do not bury splices or boxes behind tile, drywall, mirror glass, or plaster. Access to wiring connections must remain available.
Use the supplied or approved mounting hardware. A mounting plate is not just any metal strip. The safest plate is the one that came with the fixture or is explicitly approved as a replacement. Manufacturer instructions control the details, including plate orientation, screw type, and grounding method.
Use a qualified electrician for wiring, grounding, missing boxes, box relocation, or any installation in damp or wet bathroom locations. Follow local electrical requirements.
For Indian Bathroom Projects
Indian bathrooms bring specific challenges. Concealed conduit, tile work, mirror panels, stone cladding, and compact layouts all affect how a vanity light wall mounting plate installation plays out.
Finalize the light position before tile or mirror work. Once tile, stone, or a full mirror panel is installed, correcting an off-center or buried electrical box is both expensive and visually disruptive. Ask the electrician to align the wall box with the mirror centerline and the final vanity height during the rough electrical stage.
Check whether the fixture’s backplate will cover the conduit or box opening. In many Indian apartments, the electrical point for a mirror light or vanity light is a simple conduit exit in the wall. The backplate needs to be large enough to cover it cleanly.
Verify LED driver compatibility with the Indian domestic supply of 230 V at 50 Hz. Imported fixtures designed for 120 V markets need a compatible driver or transformer.
In humid bathrooms, check fixture suitability. Compact Indian bathrooms where the vanity area is close to the shower zone require fixtures rated for damp or wet conditions. Unmarked fixtures near wet zones are a risk.
For premium projects, coordinate everything together. The light, mirror, wall finish, and electrical point should be planned as a system, not selected individually and hoped to fit. This is especially true with decorative wall lights where the backplate shape and size are part of the design statement.
If you are planning vanity or bathroom wall lighting for an Indian home, ALC Studio offers free design consultations and pan-India delivery, with showrooms in Delhi (Kirti Nagar) and Lucknow where you can see fixtures and mounting hardware in person.
Vanity Light Specs Worth Checking While You Are at It
Since you are already thinking about the mounting plate, take a moment to verify a few lighting specs that affect the final result.
Placement. An above-mirror vanity bar is typically centered on the mirror and positioned about 75 to 80 inches from the floor, or roughly 6 to 8 inches above the mirror’s top edge. The fixture width should be around 75% of the mirror width when side lighting is not an option.
Color temperature. Most designers recommend 2700K to 3000K for a warm, flattering bathroom environment. Some prefer 3500K for a slightly cooler feel that still renders skin tones well.
CRI. For grooming and makeup accuracy, CRI 90 or above is the practical standard. Lower CRI makes colors look dull and inaccurate under artificial light. If you are choosing between fixtures that look similar on paper, CRI is often the spec that separates a good bathroom light from a mediocre one.
For guidance on sizing and selecting lighting fixtures for different room types, ALC Studio’s guide on choosing chandelier sizes covers the formulas and proportions that apply broadly across fixture categories.
FAQs
Is a vanity light wall mounting plate the same as a backplate?
Not always. The mounting plate is usually the hidden hardware that fastens the fixture to the electrical box or wall. The backplate is often the visible decorative plate on the rear of the fixture. Some vanity bars combine the two into a single piece, which is why the terms get mixed up constantly.
Can I install a vanity light without the mounting plate?
Usually no. The plate provides the correct screw points, alignment, and support. If it is missing, determine whether the fixture uses a generic fixture bar or a specific manufacturer plate. Reddit and forum discussions show that some missing plates can be replaced with standard fixture bars from a hardware store, while others are fixture-specific and need to come from the manufacturer.
Can I screw the vanity light directly into the wall?
Do not assume that is safe or correct. Some fixtures allow wall anchoring in addition to an electrical box connection, but the manufacturer’s instructions determine what is acceptable. One bath vanity light manual permits wall anchoring but still requires power from a standard recessed electrical box. Skipping the box is generally not an approved shortcut.
Do vanity lights need a junction box?
In most modern installations, yes. The junction box contains wiring connections and provides mounting points for the plate. Some listed vanity bar fixtures may have an integral wiring compartment, but that is a fixture-specific design exception, not a general rule.
Are vanity light mounting plates universal?
Some are, and some are not. Universal crossbars and round plates have slotted holes to fit common box screw patterns. But designer fixtures, long vanity bars, and imported lights may require the exact plate supplied with the fixture. Never assume “universal” means guaranteed compatibility.
What if the new mounting plate does not line up with the wall box?
Check the plate orientation first, since many plates can be rotated. Use the slotted holes if available. Make sure you are not confusing the box-to-plate screws with the plate-to-fixture screws. If none of that works, the box may need adjustment, or the fixture may need a different bracket. Do not force it.
Should the mounting plate be visible after installation?
No. In most vanity lights, the plate is completely hidden behind the fixture’s visible backplate or body. If hardware is visible unintentionally, the wrong plate, wrong screw length, incorrect box depth, or wrong orientation may be the cause.
What should I ask before buying a vanity light online?
Ask for the backplate dimensions, mounting plate type, wall box requirement, damp or wet suitability, driver voltage, fixture weight, and whether all mounting hardware is included. This matters most for premium bathrooms where wall finishes are already complete and a mismatch means visible damage.
0 Comments
There are no comments for this article. Be the first one to leave a message!